
If you are developing cross-platform apps in Xamarin then you've might heard of Flutter- the new framework for building apps for Android and iOS from Google using dart language.
If you have never coded in Flutter then this post is for you.
Follow the instructions in this page to get Flutter SDK (on Windows): https://flutter.dev/docs/get-started/install/windows
To set up the editor: https://flutter.dev/docs/get-started/editor?tab=vscode
For in-depth comparison between Flutter and Xamarin.Forms visit this page: https://flutter.dev/docs/get-started/flutter-for/xamarin-forms-devs
Few points you need to know to get started with Flutter:
Everything in Flutter is a Widget, meaning that a page is a widget, Text (Label in X.F) is a Widget, even properties like Padding is also widget, the app itself is a widget. And there are two types of widgets: StatelessWidget and StatefulWidget, as their names implies, the StatefulWidget has a state and can change over the course of the application, so if a page has a TextField(Entry in Xamarin) the the page should be of type StatefulWidget because the state of the TextField is changing.
This is an example of a simple StatelessWidget:
class SimpleStatelessWidget extends StatelessWidget {
  @override
  Widget build(BuildContext context) {
    return Center(child: Text('Hello Flutter!'));
  }
}
And this is an example of a simple StatefulWidget:
class SimpleStatefulWidget extends StatefulWidget {
  const SimpleStatefulWidget({
    Key key,
  }) : super(key: key);

  @override
  _SimpleState createState() => _SimpleState();
}

class _SimpleState extends State<SimpleStatefulWidget> {
  @override
  Widget build(BuildContext context) {
    var usernameController = TextEditingController(text: 'dev');

    return Center(child: TextField(controller: usernameController));
  }
}
As you progress in Flutter you will notice that you write a lot of code compared to what you used to in Xamarin, but the good news is, Flutter has a great toolset for nearly anything, so you won’t be worry about missing controls.
Things to note:
- StatelessWidget is composed of only one class and there you should override the build method.
- StatefulWidget is composed of two classes, the main StatefulWidget class and the State class.
- In the StatefulWidget you override the createState method that returns a State class (a generic class of the StatefulWidget type)
- You override the build method in the State class.
- The build method is responsible for building the UI.
Now after you have a very basic understanding (I hope) of a Flutter app, let’s see how would you implement MVVM in Flutter. (remember you can read in depth comparison between Flutter and Xamarin from an official source here , but no mention to state management).
In Xamarin you manage state using MVVM- a very popular pattern for XAML based apps, including WPF and UWP as well as Xamarin.Forms, there are some built-in methods to manage state in Flutter (InheritedWidget, Scoped Model) but they are limited and can’t adapt most of your business needs, for that, Google developed a pattern called BLoC (Business Logic Component) but it’s complex, and require a lot of code. In I/O 2019 they announced a package that is simple and powerful for managing state, they didn’t develop it but they adopt it and working closely with its author to improve it. This is the provider package.
This is a quick comparison between MVVM in Xamarin and Flutter:

The rest of the article I’m going to build this page applying MVVM with provider:
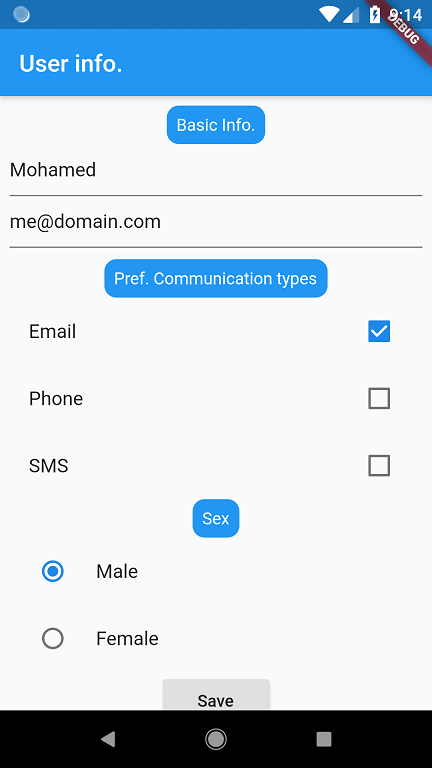
Notice the presence of the checkbox and radio button, missing them in Xamarin? they are basic controls in Flutter, from the material package.
I’m assuming you are a Xamarin developer, then you have experience in C#, great, you can understand dart easily.
Let’s create this model class in the models folder:
class UserModel {
  UserModel() {
    username = "Mohamed";
    email = "me@domain.com";
    comms = [Comm.email];
    isMale = true;
  }

  String username;
  String email;
  List<Comm> comms;
  bool isMale;
}

enum Comm { email, phone, sms }
View model:
class UserRepository with ChangeNotifier {
  UserRepository() {
    user = new UserModel();
  }
  UserModel _user;
  UserModel get user => _user;
  set user(UserModel newValue) {
    if (newValue != _user) {
      _user = newValue;
      notifyListeners();
    }
  }

  void save() {
  }
}
The ChangeNotifier interface (mixin) compose the notifyListeners() method, similar to the PropertyChanged event of the INotifyPropertyChanged.
To communicate the view model with the view, you wrap the root widget inside ChangeNotifierProvider widget:
class ProviderApp extends StatelessWidget {
  @override
  Widget build(BuildContext context) {
    return MaterialApp(
      home: ChangeNotifierProvider(
          builder: (context) => UserRepository(), child: UserInfoWidget()),
    );
  }
}
it takes two parameters: the child (the inner descendant) and a builder function (think of setting the BindingContext in Xamarin). Thus any descendant of the ChangeNotifierProvider have access to the view model, and you can have reference of it by calling the generic of method of the Provider class:
userRepo = Provider.of<UserRepository>(context);
Great, after you’ve set the BindingContext of the view, how to bind every single widget with the opposite view model property?
Things gotta more complex not as simple as what you’ve used to in Xamarin using the Binding extension, you will handle any state change in the widget events, but in opposite you have full control on what’s going on, and you won’t need things like converters, behaviors, etc.
For example this is the TextField of the username property:
TextField(
  controller: usernameController,
  onChanged: (val) => userRepo.user.username = val)
Here you handle the state change in the onChanged event, the controller of the TextField was initialized with its text parameter bound to the view model property
TextEditingController usernameController =
        TextEditingController(text: userRepo.user.username);
Email checkbox:
CheckboxListTile(
  title: Text('Email'),
  value: userRepo.user.comms.contains(Comm.email),
  onChanged: (checked) {
    setState(() {
      if (checked)
        userRepo.user.comms.add(Comm.email);
      else
        userRepo.user.comms.remove(Comm.email);
    });
  },
),
With every change in the checkbox checked state you call setState (setState available for StatefulWidget in the State clas) which rebuild the widget.
Sex field:
RadioListTile(
  title: Text('Male'),
  value: true,
  groupValue: userRepo.user.isMale,
  onChanged: (value) {
    setSex(userRepo.user, value);
  },
),
RadioListTile(
  title: Text('Female'),
  value: false,
  groupValue: userRepo.user.isMale,
  onChanged: (value) {
    setSex(userRepo.user, value);
  },
),
setSex:
  void setSex(UserModel user, value) {
    setState(() {
      user.isMale = value;
    });
  }
Also in every change in the RadioListTile state you call the setState.
Hope you could understand the state management in flutter in the light of MVVM we all love in Xamarin.
